BAGS SORTED


As it is getting quite boring talking about my training routine without a
nice long ride with nice pictures to show, let's talk about preparation.

Part of the journey to prepare for the race in August is to learn what it means to go bikepacking from an equipment point of view. Researching the internet and watching a ton of videos on YouTube, I learned very quick that this is not only about being fit and strong. It is about being very careful in preparation and there is a ton of things that needs to be sorted out like sleeping stuff, lights, tools and replacement parts, food and water, what to wear while on the bike and out of the bike, etc. 

It is a lot of stuff to bring with you on the bike and the first thing that I decided to sort it out was the types of bags that I would be using. I had a lot of questions for what combination of bags should I use. There are many options, like: small frame bag with water bottles or large frame bag with a camelbag in my back or a large frame bag with a water bladder inside? A small handlebar bag in front for the sleeping stuff or shove everything in the saddle bag? Where to hold the battery pack, mobile, passport, etc.

I read many blogs and videos on youtube from people that have done this type of thing before and shared a lot of tips. But at the end there is a lot of personal trial and error and preferences and the advice to adapt for the type of event one is going. So a lot of thinking and experimenting during the training rides prior to the big event is required and that is what I'm planning to do. 

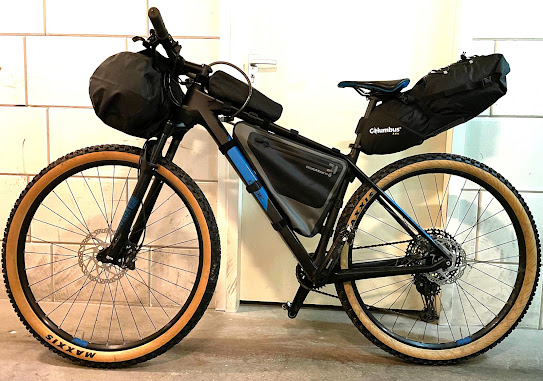
But there are a couple of general advices for any setup. The most common is to keep the heaviest items lower and centered on the bike to help with the center of gravity, the lightest items should be on the handlebar to avoid messing with the ability to manage and steer the bike and make sure they if you have a large saddle bag, they are very secure on the bike to avoid getting the bike off balance.

Another really important point is that a lot of stuff means and bags also mean a lot of weight. And more weight means harder climbing. So, it is not only the weight of everything one has to bring, which I will create a post later, but the eight of the bags themselves. Which added a lot of complexity to my search. It is not only a matter of throwing money at it and buy the most expensive. It has to be also light and considering that I'm not sure I will do an event like this more than once (I know, said the same thing about the Etape du Tour de France), I don't need to buy the strongest.

My research for the cheapest and lightest bags showed the follow results:

Saddlebag

  1. Zefal Z Adventure R17 - 17l - 620g - 60 euros

  2. Apidura Expedition - 17l - 425 g - 149 euros

  3. Ortlieb 16.5 l - 456 g - 135 euros

  4. Topeak backloader - 565 g - 65 euros

  5. Woho - 13 l - 390 g - 85 euros

  6. Columbus - 18 l - 355 g - 42 euros


Handlebar bag

  1. ORTLIEB HANDLEBAR PACK - 15L - 420g - 

  2. RESTRAP BAR STUURTAS - 14 L - 550g -  100 euros

  3. Zefal Z-Adventure - 10 l - 340 g - 50 euros 

  4. Apidura Expedition Handlebar - 9 l - 250 - 109 euros

  5. Apidura Expedition Handlebar - 14 l - 275 - 118 euros 

  6. Topeak front loader - 8 l - 325 g - 60 euros

  7. No brand - 15 l - 200 g - cheap as you wouldn't believe


So, all the big brands are quite expensive. And I was very surprised how heavy some of them are. They feel very sturdy and nice when you pick them up in the store, but is that worth the price of the weight you need to carry? And while I was about to buy the hype of all those youtubers telling me to buy (maybe endorsed) stuff, the most expensive Apidura bags, I decided that I will do all my next training using the cheapest and light bags from Columbus and the one with no brand and see how they hold. The Columbus feels a bit wobbly but I will find a way to get it more secure with an extra strap. And the front one is a mystery. We will see in real life conditions...

If all good, then we will see how they last one crazy adventure and if tossed at the end, no big deal. If I get hooked and continue in the future doing this type of crazy shit, I will consider the expensive toys.


FRAMEBAG AND WATER SYSTEM - The only big brand bag I bought was the framebag Blackburn Outpost Elite (even the name is pedantic). And that was for two reasons: it is the only one that fit my frame nicely without leaving too much space unused. And because it has two compartments with a divider in the middle that I can keep or remove.

I thought that would be the perfect way to store water on the top and tools at the bottom. Water is is really heavy and I wanted in securely attached to the center of the bike and I don't have to carry it on me. I also wanted to have opportunity to carry 3 liters and not the traditional 2 bottles of 1 liter, just in case one of the stretches goes thru a desert and it is too long. Read too many stories about it! And I found the perfect one from Evoc that had exactly the dimensions of the top part of the Blackburn.

So, this is all sorted to start testing in real life and I'm really looking forward to get this junk on the road :)

Next decision: sleeping system! Not as simple as you might expect.


WEEK 5 TRAINING FULL & WIND


67 kms | 2 h 44 m | 25 km/h avg | wind force 5

Finally a full week of training done with a mix of high intensity training and one ride which was supposed to be endurance training with low heart rate, but it quickly turned into a battle against the wind and a heart rate going thru the roof just to keep moving ahead. The total in the week was 5 hours trained with 2 sessions of intervals on Monday and Wednesday and a longish ride Saturday of 3 hours. This is still 3 hours short of the indicated 8 hours of training per week for events such as an ultra-endurance cycling race. The agenda will have to be slightly adjusted adding one extra hour on the week and two extra hours on the weekend.

The ride on Saturday was absolutely crazy. Left home and decided to ride in the direction of a small island in the Northeast of Amsterdam, called Marker. It is a nice beautiful place with open fields and small wooden houses. But I didn't count on a crazy wind coming at force 5 and the route put me on a constant cross wind for the full 3 hours. On the way to the the wind was cross but sometimes helping, but on the 30 kms back which I decided to take a different route, it was either headwind os slightly from the right. It was a real hard training, pushing and pushing against it just to keep a meager 22 kms / h and sometimes going down even to 18 kms / h. 

At some point I passed a guy on a race bike hiding behind a woman on a normal electric bike. Later, 3 cyclists passed me on a comical slow motion way, advancing inch my inch and everybody having a blast! Há, blast of wind... not funny. It was really brutal and I got home completely empty and a bit dizzy from all the wind gushing thru my ears! I guess it was a good mental resilience training...

PERFORMANCE - Looking at Golden Cheetah,  the software I use to track my training load and how my fitness level is progressing, my performance seems to be going in the right direction. I recorded every training and ride into my Garmin or Tacx and then load into the app. It calculates training volume and based on that your fitness level and fatigue levels which I use to see if the training is going in the right direction and when I need to rest and recover. The graph shows that steady increase in fitness, going around 32 points on Sunday. The higher it gets the harder is to gain fitness but at this moment is pretty low, so I have a lot to increase. The goal is reach around 100 points by August.

The other part of the load is the amount of fatigue one is accumulating (stress balance = fatigue) and that should be used to indicated when to continue training and when to rest and recover. At the end of Saturday, my stress balance was around -24 points, which was a good result of the week but borderline when I need to rest. Indication is at any time below -30, the next day should be a rest / recovery day. Which is exactly what I did on Monday.

All of this is based on Trimp points (See below definition). This is a great way to check how much stress you are accumulating and how much risk of burnout / injury one has. 

A good solid week of training and some good preparations in the equipment front. Some decisions made in terms of water system, lights and bags. But that is a new post for later in the week. 

TRIMP is an abbreviation of TRaining IMPulse. It was originally defined as the product of training volume, measured in minutes, and training intensity, measured as average heart rate (beats per minute or bpm). For example, 50 min at 140 bpm TRIMP = 50 × 140 = 7000.